Preparation of a model for printing is an operation that requires attention and that the benefits far outweigh the time invested. A forgotten RGB profile picture or a character (font) unconverted to curves can compromise the whole work.
Te graphical editing of the model
Graphic model is done in a specialized graphics program (Corel Draw, Corel Photo Paint, Adobe Photoshop, Adobe Illustrator, Adobe InDesign, etc.) and not office applications (Microsoft PowerPoint, Microsoft Excel, Microsoft Word, etc.) . Office applications do not provide the necessary control over the size of the model, the layout of graphics or color decay, mandatory elements in this area.
Model Components
The model is composed of text, graphics and images.
– In text the problem lies in choosing the type of font – a special font installed on your computer can create print problems if you do not sent it along with the model (for “open” files – with layers).
– For images, the main problem is the resolution. This should be around 300 dpi, which makes the most of the pictures downloaded from the internet, at a resolution of 72 dpi to not be suitable for print, only much diminished.
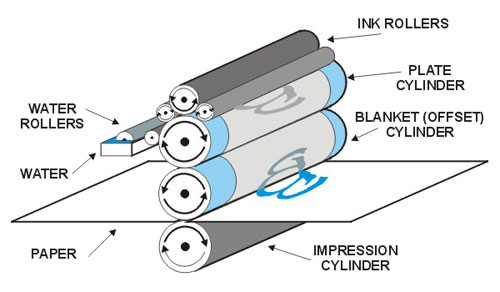
A second important issue is the color spectrum. Often it is not the difference between the two types CMYK and RGB . The first is the standard for pattern here making use of 4 colors (Cyan Magenta Yellow K = black). Second, Red Green Blue – is the spectrum monitors use. An RGB image created and converted to CMYK will look different from the original (eg becomes greenish yellow).
Model verification
After completing the model, before sending it to print, check the following:
- The page size (many applications set the default page at “A4” and not your desired size)
- Bleed – Photo and graphic objects (lines, colorful backgrounds, etc.) that come to the edge of the page should exceed it by 3-5 mm (prevents the occur of white edges at cutting). Finished format is calculated along with bleed – XXY mm.
- The safety margin – represent the area about 3mm where should to be placed intact items that will be placed on the final product (after cutting).
- Text, graphics and images to be in CMYK spectrum
- The resolution pictures should be 300 dpi (if you want to understand better the resolution “problem” you can read our article “How many pixels we need for a good print?”)
Sending files
Files can be sent in the following formats:
- .tif – CMYK, without layers (flatten) with LZW compression
- .cdr – Corel Draw – all images are bitmaps – CMYK, fonts converted to curves – CMYK objects converted to curves – CMYK
- .ai – Adobe Illustrator – fonts converted with the “Create outline” function Shift + Ctrl + O or transmitted along with graphical model
- .psd – Adobe Photoshop – to 300 dpi in CMYK mode, without layers (flatten)
- .jpg – generated at maximum quality